


Installing Apps on Enhance (WordPress, Joomla & More)
How the Apps tab on the Enhance control panel works: one-click installs for WordPress, WooCommerce, and Joomla, what Enhance sets up for you, and the WordPress toolkit that comes with it.
6 min read
On GoZen VPS and cloud plans that run the Enhance control panel, installing a CMS is a single form. Enhance downloads the application, creates the database and user, writes the configuration file, and sets file permissions. There is nothing to upload and no database to create by hand.
This guide explains where the installer lives, which applications it supports, and what Enhance gives you after the install. For a full walkthrough of one application, see Install WordPress on Enhance or Install Joomla on Enhance.
Which applications are available
Enhance’s one-click installer currently offers:
- WordPress, optionally with WooCommerce preinstalled
- Joomla
- OpenClaw, a self-hosted AI agent
The list you see depends on your hosting package. Enhance lets the package control which applications can be installed, so if an app is missing from the picker, or the Install app button is not there at all, the software installer is not enabled on your plan. Open a ticket and we can check.
Anything else, such as Drupal, Nextcloud, or a Laravel project, can still be installed the traditional way through the file manager, SFTP, or Git, with a database created on the Databases page.
Where to find the installer
There are two routes, and they end up in the same place.
On an existing website:
- Log in to your Enhance panel.
- Go to Websites in the sidebar and open the site.
- Click Apps in the top navigation.
When creating a new website:
- Go to Websites and click Add website.
- In the form, choose Install an app and pick the application.
- Complete the rest of the form and click Add.
The second route is the quicker one if the site does not exist yet. Enhance creates the website and installs the application in one step.
Installing an application
On the Apps page of a site with nothing installed, you will see a No applications message with two buttons:
- Install app opens the application picker.
- Scan looks for an application already present in the site’s files. Use it after a manual upload or a migration so Enhance can register the install and show it on this page.
Click Install app, choose the application, fill in the short form, and click Install. For WordPress you can pick a subdirectory if you do not want it in the document root. Depending on the Enhance version, the form either asks for the site title and admin login here, or WordPress shows its own setup wizard the first time you open the site. Within a few seconds the application appears on the Apps page as a card.
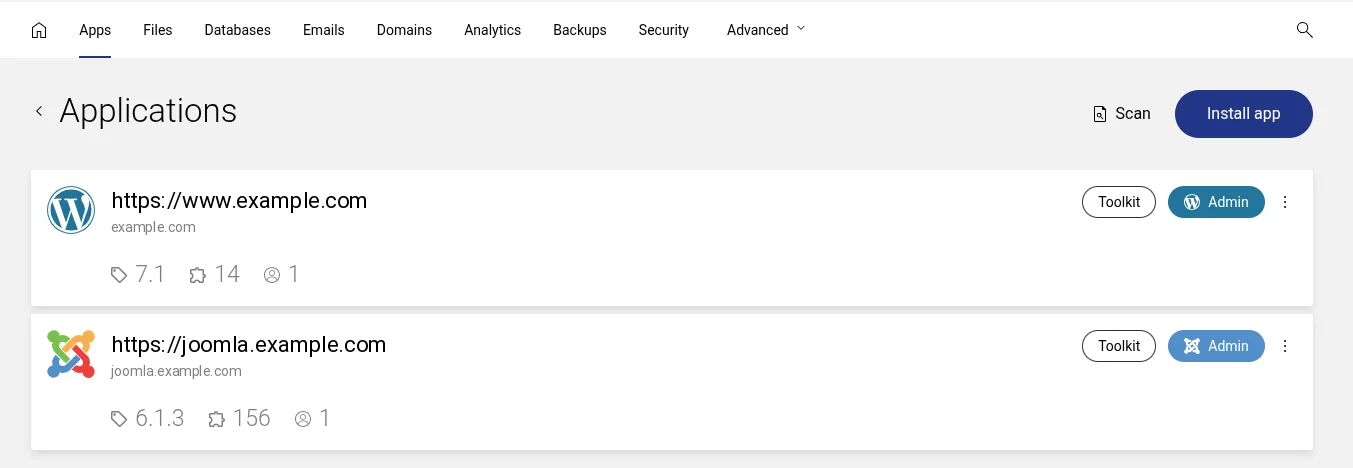
Each card shows the application’s version, how many plugins or extensions it has, and how many users, plus two buttons: Toolkit opens Enhance’s management tools for that install, and Admin logs you straight into the application’s admin area without a password prompt. The menu (⋮) on the right is where you remove an install.
Behind that one click, Enhance:
- downloads the current stable release of the application
- creates a MySQL database and a database user with a generated password
- writes the application’s configuration file with those credentials
- sets the file and directory permissions the application expects
- installs into the document root, or into the subdirectory you chose
You can see the database it created on the site’s Databases page. Leave it alone unless you know why you are changing it.
Enhance can hold more than one WordPress install on a single website, each in its own subdirectory. Every install is listed and managed separately on the Apps page.
What you get after a WordPress install
WordPress on Enhance comes with a built-in toolkit, so most day-to-day maintenance can be done from the panel without logging in to wp-admin.
| Toolkit area | What it does |
|---|---|
| Overview | Version, update status, and a wp-admin button that logs you straight in using single sign-on |
| Plugins and themes | Install from the WordPress directory or from a custom URL, activate, deactivate, update, and delete |
| Updates | Choose an automatic update schedule for WordPress core (minor versions only, or always latest) and set auto-updates per plugin and theme |
| Users | Add and remove WordPress users, change roles and passwords |
| Staging | Clone the site to a staging copy, test changes, then Push live to copy them back |
| Security | Restrict wp-admin to specific IP addresses, and toggle maintenance mode during updates |
| Debug | Switch WP_DEBUG, WP_DEBUG_LOG, and WP_DEBUG_DISPLAY on and off without editing wp-config.php |
Three things to know about it:
- Staging is reachable from the top of the website dashboard as well as the toolkit. Staging copies are marked
noindexautomatically, so search engines will not pick them up. On recent Enhance versions, pushing live also carries across cron jobs and IonCube settings. - Automatic core updates are set per site. The safe default for most sites is minor versions only, which covers security releases without jumping major versions unattended.
- Backups are separate from the toolkit. Take one on the site’s Backups page before a major update. Enhance can restore individual files from a backup, not just the whole site. See Backups on Enhance.
Joomla installs get a Toolkit and Admin button of their own, with the card showing the Joomla version, extension count, and user count. The toolkit is smaller than the WordPress one, and version updates are still run from the Joomla administrator.
PHP version and extensions
New websites on current Enhance releases default to PHP 8.3, and 8.4 and 8.5 are available alongside older versions for applications that need them. To change it:
- Open the site and go to Advanced, then Developer Tools.
- Pick the PHP version. The change applies within seconds and does not restart anything else on the server.
The same section has a PHP extension manager where you can enable optional extensions for the site. If you switch PHP versions, Enhance automatically disables any extension that is not compatible with the new version, so check the list afterwards if a plugin stops working.
Cron jobs for the application also live under Developer Tools. See Setting Up Cron Jobs in Enhance.
Web server and SSL
Enhance runs one web server per server, and it applies to every site on that server: Apache, Nginx, LiteSpeed, or OpenLiteSpeed. The server administrator can switch it without configuration changes. For WordPress, OpenLiteSpeed pairs with the free LiteSpeed Cache plugin for server-level page caching.
SSL needs no action. Once the domain’s DNS points at your server, Enhance requests a Let’s Encrypt certificate, installs it, and renews it before expiry. If a freshly installed site shows as “Not secure”, DNS has usually not propagated yet. See SSL Certificates on Enhance.
If the Apps page does not show your site
Two common cases:
- You migrated or uploaded WordPress by hand and the Apps page says no applications. Click Scan. If it still reports nothing, Enhance could not read the install with WP-CLI. The usual cause is a
wp-config.phpthat pulls its database credentials from a separate file instead of defining them directly. - The Install app button is missing. Either the website has not been created yet, or the software installer is disabled on your package. Create the site first, then ask support if the button is still absent.
Related articles
- Install WordPress on Enhance - step-by-step install and post-install checklist
- Install Joomla on Enhance - the Joomla equivalent
- Enhance Control Panel Guide - the rest of the panel
- Managing Databases on Enhance - for applications you install by hand
- cPanel vs Enhance: Which Control Panel? - if you are deciding between the two
Last updated 21 Oct 2026, 00:00 +0300.